

Precision 2000 Dia De Los Muertos Mosaic Panel Project
Features
Free Mosaic Project Guide
Create a colorful mosaic panel with the Preciison 2000!
Additional Media
Description
Project Tips:
• Always, wear safety goggles when using glass-crafting tools. Everyday eyeglasses have only impact resistant lenses.
• Always wear a dust mask when cutting wood.
• To ensure top performance, always use water when cutting glass and oil when cutting metal.
• Always adjust the blade guide arm to ¼” above the material being cut.
Materials:
• Precision 2000 and Studio Pro Metal Blade
• Chip Board (11 ½" x 17"), White Spray Paint
• 2 Sheets – Studio Pro G41-2 Red, 1 Sheet – Studio Pro GA146 Purple, 1 Sheet – • Studio Pro G401 White
• Glass Gems Large and Small, Charmers, WigglesBlack Patina, Tinned Copper Wire
• Black Sanded Grout, Gloves, Spoon, Bowl
• Glass Adhesive – E-6000
• Studio Pro Soldering Iron, 60/40 Solder, 54” Lead Came, Flux and Flux Brush
• Heat Resistant Work Surface, Heat Resistant Gloves, Machine Oil
• Ruler, Scissors, Petroleum Jelly, Black and Silver Sharpie
• Wheeled Glass Nippers
Instructions:
Read and carefully follow the instructions contained within the Precision 2000 Operations Manual before you begin.
1. Print two copies of the pattern. Number the sections exactly the same in the pattern on both copies.
2. Cut one pattern apart staying inside the pattern outlines. Set the other aside.
3. Place the pattern pieces on the glass and trace around them using a marker. Use a light marker (SharpieSilver) when tracing pattern onto dark glass and a dark marker on the light glass. Make sure you indicate the pattern number on the glass with the marker. Numbering the glass pieces will make it easier to assemble the mosaic panel.
HANDY TIP: To ensure the pattern and number markings do not wash off during cutting, apply a thin coat of petroleum jelly or Chapstick over the markings.
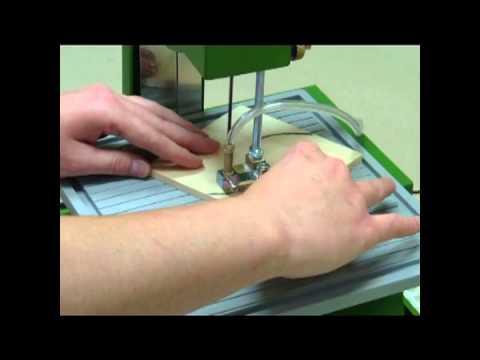
4. Set the Precision 2000 band saw up for wet cuts. Follow the Operations Manual and install the diamond blade. Using the saw, cut the pattern pieces from the glass, staying along the inside of the pattern outline.
5. When all glass is cut, dry with a paper towel or soft cloth making sure you do not to rub off the pattern number.
6. Place the pieces correctly on the second pattern. When all pieces are correctly placed, remove the marker with alcohol and return them to their position on the pattern.
CAUTION: Wood and Metal Blades have teeth and will cut fingers, so be careful when cutting.
7. Next, set the Precision 2000 saw up for dry cuts. Follow the Operations Manual to install the wood blade. Using the saw, cut a piece of chipboard to an 11 ½” x 17” size.
8. Once cut, remove all dust from the surface, prime using white primer or white acrylic paint. Allow to dry. Once dry, lightly mark the center of the board with a pencil.
9. Cut a piece of clear contact paper to an 11 ½” x 17” size. Remove all gems from the glass project and set aside. Remove the backing from the contact paper and press over the glass. Press firmly and evenly so that all the glass pieces stick to the paper.
10. Using a ruler and a pencil measure and mark a ½” border around the edge of the chipboard. Apply glue to the chipboard avoiding the border area.
11. Carefully pickup the contact paper and glass and center over the board. Place them, glass side down into the glue. Press into place and allow drying.
12. Once dry, carefully pull back and remove the contact paper. Apply glue to the gems and position them into the mosaic. Allow to dry.
13. Following the directions in the Operation Manual, set the saw up for dry cutting and install the metal blade.
CAUTION: Wood and Metal Blades have teeth and will cut fingers, so be careful when cutting.
14. While band saw is off, use machining oil or metal cutting oil to lubricate the blade. Apply oil directly to the entire blade.
15. Mark two - 17 1/8” and two - 11 1/2” lengths onto the came.
16. Wearing heat resistant gloves slowly guide the came into the saw making a straight cut where marked. Turn off the saw and add more oil as needed until the cuts are complete.
17. Slide the sections of came onto the edges of the chipboard.
18. Clean away any oil residue left on the came.
19. Place the chipboard on a heat resistant surface.
20. Flux corner seams and run a solder line over them. Repeat for the three remaining corners.
21. When cool, clean and apply a complimentary patina color to the solder (we used a black patina).
22. Mask off frame before grouting. Place grout in a mixing bowl and slowly add water. When the grout appears to be the consistency of brownie mix, it is ready to apply.
23. Using a gloved hand, spread the grout on the surface of the panel. Pushing it into the spaces between the glass pieces.
24. Remove excess grout, being careful not to remove the grout between the glass. Let the grout haze over (5 - 10 minutes), then remove all grout residue with a damp cloth. Let grout continue to dry.
26. When completely dry, buff glass clean.
27. Using a 14 gauge tinned copper wire, mold the wire to the shape of the mouth using the pattern as a guide. Cut and shape smaller pieces of wire for the teeth, once again using the pattern as a guide.
28. Place your wire pieces on a heat resistant surface. Lay them out according to your pattern. Use needle nose pliers to hold the smaller wires in place while you flux and add a drop of solder where the wires intersect. This will create the lines for the teeth and mouth. When cool, patina and adhere on panel in the area of the mouth using E-6000.
29. Next, coil a three inch length of the 14 gauge wire around a Sharpiemarker. When you have a coil, pull the ends apart to slightly separate the rings. Next, flush-cut the open end of the coil. Now you are ready to cut off a jump ring. Line up the blade of the flush cutter with the cut end of the wire, snip off a ring. Examine it carefully to ensure both ends of the jump ring are flush. Repeat until you have two rings.
30. Turn the panel over, measure over two inches from both sides of the panel and mark. Hold the jump ring with needle nose pliers against the top of the frame where marked. Flux and add several drops of solder to hold the jump ring into place. Repeat on the opposite side. Allow to cool and clean off flux.
31. Add a chain to the panel and hang.